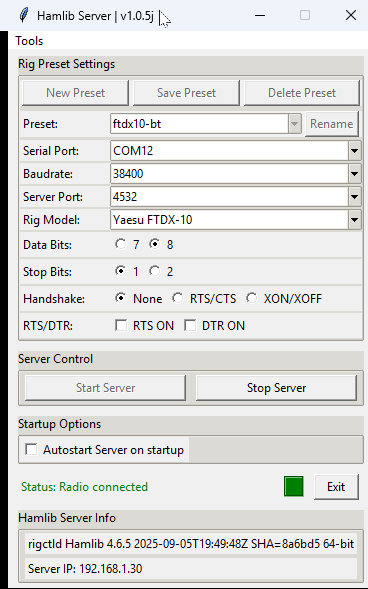
HamlibServer Setup

Nederlands / English

📘 Handleiding: Werking van HamlibServer

De HamlibServer GUI dient als schil om rigctld.exe (onderdeel van Hamlib) te beheren.
Met deze tool kun je een seriële verbinding met je radio instellen, opslaan als preset, en vervolgens de rigctld-server starten zodat andere programma’s (zoals MiniBook) via CAT-commando’s met de radio kunnen communiceren.


🔧 1. Radio selecteren

  1. Start HamlibServer.exe.

  2. In het veld “Rig Model” vind je een keuzelijst met alle ondersteunde radio’s.

    • Deze lijst wordt geladen uit data/rigs.ini.

    • Elke naam is gekoppeld aan een rig-nummer dat door Hamlib wordt gebruikt.

  3. Kies jouw radiomodel (bijv. Icom IC-7300 of Yaesu FTDX-10).

  4. Controleer of het veld “Folder containing rigctld.exe” verwijst naar de juiste map, meestal .\hamlib.


⚙️ 2. Instellingen invullen

Voer de juiste communicatieparameters in die overeenkomen met de instellingen van jouw radio:

Instelling Beschrijving
Serial Port De COM-poort waarop de radio is aangesloten. (Bijv. COM3)
Baudrate De overdrachtsnelheid. Controleer deze in het menu van je radio.
Server Port TCP-poort waarop rigctld draait (standaard 4532).
Data Bits Meestal 8.
Stop Bits Meestal 1.
Handshake Kies None, RTS/CTS of XON/XOFF afhankelijk van je interface.
RTS/DTR Schakel aan/uit indien je interface deze lijnen gebruikt.

💾 3. Preset aanmaken

Een preset is een opgeslagen set instellingen voor een specifieke radio.

  1. Stel eerst alle gewenste waarden in (COM-poort, baudrate, model, enz.).

  2. Klik op “New Preset”.

  3. Geef een naam op (bijv. IC-7300 Home of FTDX10 Portable).

  4. De instellingen worden automatisch opgeslagen in hamlibserver.ini en verschijnen in de keuzelijst Preset.


📝 4. Preset bewerken (editten)

  1. Selecteer in de combobox de preset die je wilt aanpassen.

  2. Pas één of meerdere instellingen aan (bijv. een andere COM-poort).

  3. Klik op “Save Preset” om de wijzigingen op te slaan.

  4. De wijzigingen worden direct bijgewerkt in hamlibserver.ini.


✏️ 5. Preset hernoemen

  1. Kies de gewenste preset in de lijst.

  2. Klik op “Rename”.

  3. Voer de nieuwe naam in.

  4. De preset wordt hernoemd in zowel het programma als het configuratiebestand.


🗑️ 6. Preset verwijderen

  1. Selecteer de preset die je wilt verwijderen.

  2. Klik op “Delete Preset”.

  3. Bevestig met Yes wanneer daarom gevraagd wordt.

  4. De preset verdwijnt uit de lijst en uit hamlibserver.ini.


▶️ 7. Server starten

  1. Controleer nogmaals dat alle instellingen juist zijn.

  2. Klik op “Start Server”.

  3. HamlibServer start nu rigctld.exe met de juiste parameters.

    • De status onderaan verandert naar “Status: Server started”.

    • Alle invoervelden worden tijdelijk uitgeschakeld.

  4. De rigctld-server is nu actief en luistert op de opgegeven TCP-poort (bijv. localhost:4532).


⏹️ 8. Server stoppen

  • Klik op “Stop Server” om rigctld netjes te beëindigen.

  • De status verandert naar “Server stopped”, en de instellingen kunnen weer worden aangepast.


⚙️ 9. Automatisch starten

Als je het vinkje “Autostart Server on startup” aanzet, zal HamlibServer automatisch de laatst gebruikte preset laden en de server starten bij het opstarten van het programma.


💾 Opslaglocaties

Bestand Functie
settings\hamlibserver.ini Bevat alle presets, instellingen en laatste gebruikte preset.
data\rigs.ini Lijst met ondersteunde radio’s en hun Hamlib modelnummers.


📘 HamlibServer – User Guide

The HamlibServer application provides a graphical interface for rigctld.exe, part of the Hamlib package.
It allows you to configure and start a CAT control server for your transceiver, manage multiple radio presets, and connect easily with applications like MiniBook.


🔧 1. Selecting Your Radio

  1. Start HamlibServer.exe.

  2. In the “Rig Model” dropdown, you’ll see a list of supported radios.

    • This list is loaded from data/rigs.ini.

    • Each entry corresponds to a Hamlib model number used internally by rigctld.

  3. Select the model that matches your transceiver (e.g., Icom IC-7300, Yaesu FTDX-10, Kenwood TS-590).

  4. Verify that the “Folder containing rigctld.exe” field points to the correct location, usually .\hamlib.


⚙️ 2. Setting Communication Parameters

Enter the communication settings that match your transceiver’s CAT configuration:

Setting Description
Serial Port The COM port where your radio is connected (e.g., COM3).
Baudrate The communication speed. Check your radio’s CAT settings.
Server Port The TCP port for rigctld (default 4532).
Data Bits Usually 8.
Stop Bits Usually 1.
Handshake Choose None, RTS/CTS, or XON/XOFF depending on your interface.
RTS/DTR Enable if your interface uses these lines (for PTT or CW keying).

💾 3. Creating a Preset

A preset stores all the communication and rig settings for quick access later.

  1. Enter all the desired parameters (port, baudrate, model, etc.).

  2. Click “New Preset”.

  3. Enter a name for the preset (e.g., IC-7300 Home or FTDX10 Portable).

  4. The preset will be saved to hamlibserver.ini and added to the Preset dropdown list.


📝 4. Editing an Existing Preset

  1. Select an existing preset from the dropdown list.

  2. Modify any settings (e.g., change COM port or baudrate).

  3. Click “Save Preset” to update it.

  4. The changes are written directly to hamlibserver.ini.


✏️ 5. Renaming a Preset

  1. Select the preset you want to rename.

  2. Click “Rename”.

  3. Enter the new preset name.

  4. The preset is updated both in the list and in the settings file.


🗑️ 6. Deleting a Preset

  1. Choose the preset you want to remove.

  2. Click “Delete Preset”.

  3. Confirm the deletion when prompted.

  4. The preset will be permanently removed from the list and from hamlibserver.ini.


▶️ 7. Starting the Server

  1. Verify all settings are correct.

  2. Click “Start Server”.

  3. HamlibServer launches rigctld.exe using your current configuration.

    • The status changes to “Server started” in green.

    • All input fields and preset controls are temporarily disabled.

  4. The server now listens for CAT connections on the defined TCP port (default localhost:4532).


⏹️ 8. Stopping the Server

  • Click “Stop Server” to safely terminate rigctld.

  • The status changes to “Server stopped” in red.

  • All controls become editable again.


⚙️ 9. Autostart Option

If you check “Autostart Server on startup”, HamlibServer will automatically:

  • Load the last used preset.

  • Start rigctld as soon as the application opens.


💾 Configuration Files

File Purpose
settings\hamlibserver.ini Stores all presets, last used preset, and Hamlib path.
data\rigs.ini Contains all supported rig names and their Hamlib model numbers.

Summary:

  • Easily manage multiple transceiver configurations via presets.

  • Automatically launch rigctld with the correct parameters.

  • Integrates smoothly with MiniBook and other CAT-enabled applications.