📘 HamlibServer usage
The HamlibServer application provides a graphical interface for rigctld.exe, part of the Hamlib package.
It allows you to configure and start a CAT control server for your transceiver, manage multiple radio presets, and connect easily with applications like MiniBook.
🔧 1. Selecting Your Radio
-
Start HamlibServer.exe.
-
In the “Rig Model” dropdown, you’ll see a list of supported radios.
-
This list is loaded from
data/rigs.ini. -
Each entry corresponds to a Hamlib model number used internally by rigctld.
-
-
Select the model that matches your transceiver (e.g., Icom IC-7300, Yaesu FTDX-10, Kenwood TS-590).
-
Verify that the “Folder containing rigctld.exe” field points to the correct location, usually
.\hamlib.
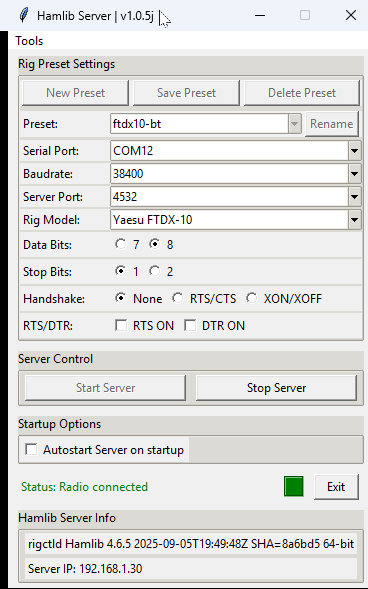
⚙️ 2. Setting Communication Parameters
Enter the communication settings that match your transceiver’s CAT configuration:
| Setting | Description |
|---|---|
| Serial Port | The COM port where your radio is connected (e.g., COM3). |
| Baudrate | The communication speed. Check your radio’s CAT settings. |
| Server Port | The TCP port for rigctld (default 4532). |
| Data Bits | Usually 8. |
| Stop Bits | Usually 1. |
| Handshake | Choose None, RTS/CTS, or XON/XOFF depending on your interface. |
| RTS/DTR | Enable if your interface uses these lines (for PTT or CW keying). |
💾 3. Creating a Preset
A preset stores all the communication and rig settings for quick access later.
-
Enter all the desired parameters (port, baudrate, model, etc.).
-
Click “New Preset”.
-
Enter a name for the preset (e.g.,
IC-7300 HomeorFTDX10 Portable). -
The preset will be saved to
hamlibserver.iniand added to the Preset dropdown list.
📝 4. Editing an Existing Preset
-
Select an existing preset from the dropdown list.
-
Modify any settings (e.g., change COM port or baudrate).
-
Click “Save Preset” to update it.
-
The changes are written directly to
hamlibserver.ini.
✏️ 5. Renaming a Preset
-
Select the preset you want to rename.
-
Click “Rename”.
-
Enter the new preset name.
-
The preset is updated both in the list and in the settings file.
🗑️ 6. Deleting a Preset
-
Choose the preset you want to remove.
-
Click “Delete Preset”.
-
Confirm the deletion when prompted.
-
The preset will be permanently removed from the list and from
hamlibserver.ini.
▶️ 7. Starting the Server
-
Verify all settings are correct.
-
Click “Start Server”.
-
HamlibServer launches
rigctld.exeusing your current configuration.-
The status changes to “Server started” in green.
-
All input fields and preset controls are temporarily disabled.
-
-
The server now listens for CAT connections on the defined TCP port (default
localhost:4532).
⏹️ 8. Stopping the Server
-
Click “Stop Server” to safely terminate rigctld.
-
The status changes to “Server stopped” in red.
-
All controls become editable again.
⚙️ 9. Autostart Option
If you check “Autostart Server on startup”, HamlibServer will automatically:
-
Load the last used preset.
-
Start rigctld as soon as the application opens.
💾 Configuration Files
| File | Purpose |
|---|---|
settings\hamlibserver.ini |
Stores all presets, last used preset, and Hamlib path. |
data\rigs.ini |
Contains all supported rig names and their Hamlib model numbers. |
✅ Summary:
-
Easily manage multiple transceiver configurations via presets.
-
Automatically launch rigctld with the correct parameters.
-
Integrates smoothly with MiniBook and other CAT-enabled applications.