MiniBook WordPress Plugin – Manual Installation Guide
This page explains how to manually install and activate the MiniBook WordPress plugin.
Manual installation is recommended when:
- You received the plugin as a ZIP file
- The plugin is not installed via the WordPress plugin directory
- You prefer full control over the installation process
Requirements
Before installing the plugin, ensure that:
- You have administrator access to your WordPress site
- WordPress is up to date
- Plugin uploads are enabled by your hosting provider
No additional PHP extensions or external services are required.
Step 1 – Obtain the Plugin ZIP File
Make sure you have the MiniBook WordPress plugin as a ZIP file.
Download: https://minibook.pd5dj.nl/downloads/WordPress_plugin/pd5dj-minibook-dashboard.zip
Important:
- Do not unzip the file locally
- Upload the ZIP file exactly as provided
Step 2 – Upload the Plugin via WordPress
- Log in to the WordPress admin dashboard
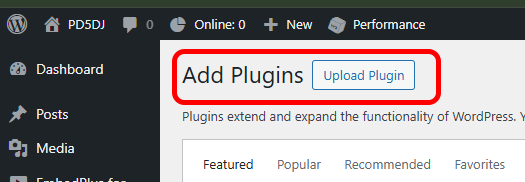
- Go to Plugins → Add New
- Click Upload Plugin at the top of the page
- Click Choose File and select the MiniBook plugin ZIP file
- Click Install Now
WordPress will upload and extract the plugin automatically.
Screenshot placeholder:

Step 3 – Activate the Plugin
After installation completes:
- Click Activate Plugin directly
—or—
- Navigate to Plugins → Installed Plugins
- Locate MiniBook in the list
- Click Activate
Once activated, the plugin is ready to receive updates from MiniBook.
Screenshot placeholder:

Step 4 – Verify Installation
After activation:
- The MiniBook plugin appears in the plugin list
- Shortcodes and widgets provided by the plugin are available
At this point, the plugin is installed but not yet connected to MiniBook.
Step 5 – Configure MiniBook
Open MiniBook on your local system and:
- Open the Preferences window
- Locate the WordPress / Web integration section
- Enter your WordPress website URL
- Copy the API key shown in MiniBook
- Set the update interval if applicable
MiniBook will now start sending live status updates to your website.
Screenshot placeholder:

Alternative Installation via FTP
If plugin uploads are disabled by your hosting provider:
- Unzip the plugin ZIP file locally
- Upload the extracted folder to:
wp-content/plugins/ - Log in to WordPress
- Go to Plugins → Installed Plugins
- Activate MiniBook
Common Installation Issues
“The package could not be installed. No valid plugins were found”
This usually means:
- The ZIP file contains an extra folder level
- The main plugin PHP file is not located in the root of the plugin folder
Solution:
- Open the ZIP file and verify that the main plugin file is directly inside the plugin directory
Plugin Does Not Appear After Upload
Possible causes:
- File permissions prevent extraction
- Upload was interrupted
Solution:
- Use FTP installation instead
Security Notes
- The plugin only accepts inbound updates from MiniBook
- No login credentials are shared with WordPress
- No remote control functionality exists
Conclusion
Once installed, the MiniBook WordPress plugin provides a reliable bridge between your local MiniBook application and your website.
After installation, proceed to:
- Configure shortcodes or widgets
- Add screenshots and styling as desired
- Publish your live station status
This completes the manual installation process.
MiniBook Dashboard – Shortcode
This document describes the usage of the MiniBook Dashboard WordPress plugin.
Basic Usage
Place one of the following shortcodes in a page, post, or widget:
[minibook_dashboard id="YOURID"]
[minibook_dashboard id="YOURID" style="cards"]
[minibook_dashboard id="YOURID" style="dark"]
[minibook_dashboard id="YOURID" style="compact"]
[minibook_dashboard id="YOURID" style="text"]
[minibook_dashboard id="YOURID" style="text-compact"]
Alternatively, add the dashboard via Appearance → Widgets.
Styles
The style attribute controls how the dashboard is displayed. If omitted, the default style is used.
Available styles:
- default – Standard view with band icons
- compact – Smaller layout, suitable for sidebars
- cards – Card-based layout
- dark – Dark themed dashboard
- text – Text-only view
- text-compact – Minimal text-only layout
Bands
The bands attribute controls which band icons are visible in the dashboard. If omitted, all supported bands are displayed.
Important:
Band display is entirely based on the band payload transmitted by the MiniBook Desktop Application. No frequency-based band calculation is performed anywhere in this plugin.
Supported Band Groups
For convenience, commonly used bands can be grouped using predefined keywords:
- hf → 160m, 80m, 60m, 40m, 30m, 20m, 17m, 15m, 12m, 10m
- vhf → 6m, 4m, 2m, 1.25m
- uhf → 70cm, 33cm
- shf → 23cm, 13cm
Individual Band Selection
Individual bands can be specified using comma-separated values. The values must match the band identifiers transmitted by MiniBook.
Examples:
bands="20,40,80"
bands="2,70,23"
Combining Band Groups and Individual Bands
Band groups and individual bands can be freely combined. The resulting dashboard will display the union of all specified groups and bands.
Examples:
bands="hf,13"
bands="vhf,23"
bands="hf,23,13"
bands="uhf,shf,20"
Usage Examples
[minibook_dashboard id="YOURID" bands="hf"]
Displays only HF band icons.
[minibook_dashboard id="YOURID" bands="vhf,shf"]
Displays VHF and SHF bands.
[minibook_dashboard id="YOURID" bands="hf,13"]
Displays HF bands plus 13cm.
[minibook_dashboard id="YOURID" bands="hf,23,13"]
Displays HF bands plus 23cm and 13cm.
[minibook_dashboard id="YOURID" style="text" bands="hf,shf"]
Text-only layout. Band information is still shown based on the transmitted band payload.
Band highlighting always reflects the currently active band reported by the MiniBook Desktop Application.
QRZ HTML Snapshot
Each time MiniBook sends an update, the plugin automatically generates a static HTML snapshot intended for QRZ.com embedding.
Snapshot Location
/wp-content/uploads/minibook/
Snapshot Filename Format
qrz-YOURID.html
Example:
/wp-content/uploads/minibook/qrz-YOURID.html
The same YOURID is used for:
- MiniBook Desktop configuration
- WordPress shortcode
- QRZ iframe URL
Embedding on QRZ.com
Edit your QRZ.com biography or HTML section and insert the following iframe:
<iframe
 src="https://yourdomain.com/wp-content/uploads/minibook/qrz-YOURID.html"
 width="100%"
 height="300"
 frameborder="0"
 scrolling="no">
</iframe>
Adjust the height if needed. QRZ loads the static file directly — no WordPress login or PHP execution is required.
This manual reflects the current MiniBook Dashboard behaviour and supported features.