Skip to content

PD5DJ

Amateur Radio Station

Menu
  • Home
  • Info
    • Info
    • History
    • QSL Information
  • MiniBook
    • MiniBook – Introduction
    • MiniBook Guide
    • MiniBook WordPress & HTML Plugin
    • MiniBook WordPress Installation Guide
  • XLX880 Reflector
  • Activations / Contesting
    • Fieldday Juli 2th – 2017 with PD5TG
    • Mills on the air 2016
    • PI4WFL/KITE June 6th 2016
    • PACC Contest PA6NH – 2015
    • VHF Contest 2006 – Petten
  • Projects
  • For Sale / Tekoop
  • Contact
Menu

CC41-A fake HM-10 Bluetooth module, let’s get it working!

Posted on August 12, 2018March 31, 2022 by pd5dj
5
(3)

How to get the CC41-A to work with your applications.

I have bought several of these fake HM-10 modules, called CC41-A

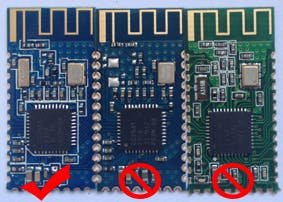
Left one is the original HM-10 module, in the middle is the fake CC41-A one.

Anyways, besides it is a fake one, the major problem i bumped into, was the fact It would not connect at all to my Ipad, Android devices or PC’s.

How did I get it to work?

I have read a lot about these modules, most of them re-flash them with the HM10 Firmware:
https://forum.arduino.cc/index.php?topic=393655.0

Not that flashing is a problem, but is this really needed for my applications?
I just need a transparent device that communicates on 115200bd.

The answer was quite simple.
The CC41-A is not configured to accept pairing from factory, that’s why I kept Pairing rejects from all these devices.

A simple command is fixing this, getting the device in another state so it would accept pairing requests.

With a simple Terminal program  set to 9600bd (default baudrate, I use the demo version of Docklight) just type the following command:

AT+TYPE3\r\n

\r is Carriage Return (decimal 013, hex 0D), and \n is Line Feed (decimal 010, Hex 0A)

You should get an answer back like: OK

That’s all!, cycle power on the module and you will see your devices will connect to them.
If any password is asked it is: 000000 (6 times zero)


Other command’s you want to use are:

Changing device name:

AT+SETNAMEnewname\r\n

Where “newname” is the new device name

for example: AT+SETNAMEMyBluetoothModule\r\n (Power Cycle required)

In device discovery you will see: MyBluetoothModule


Changing baudrate:

The last thing

AT+BAUDx\r\n

Where X is the new identifier of a baudrate.

1 = 1200bd
2 = 2400bd
3 = 4800bd
4 = 9600bd (default)
5 = 19200bd
6 = 38400bd
7 = 57600bd
8 = 115200bd
9 = 230400bd

for example: AT+BAUD8\r\n (Power Cycle required)

This will change the baudrate to 115200bd


Have fun!!!

How useful was this post?

Click on a star to rate it!

Average rating 5 / 5. Vote count: 3

No votes so far! Be the first to rate this post.

We are sorry that this post was not useful for you!

Let us improve this post!

Tell us how we can improve this post?

Leave a Reply Cancel reply

Your email address will not be published. Required fields are marked *


For Sale / Aangeboden

QRP UnUn's

YAESU Bluetooth Module

MiniBook Home

Frequency: -
Mode: -
Callsign: -
Operator: -
Locator: -
Location: -
Last update: -
160m
80m
60m
40m
30m
20m
17m
15m
12m
10m
6m
4m
2m
1.25m
70cm
33cm
23cm
13cm

Waiting for data…

MiniBook Portable

Frequency: -
Mode: -
Callsign: -
Operator: -
Locator: -
Location: -
Last update: -
40m
20m
10m
2m
70cm

Waiting for data…

  • MiniBook WordPress & HTML Plugin
  • MiniBook v1.5.0b – New Feature & Maintenance Update
  • MiniBook Release v1.50
  • Tutorial : Yaesu bluetooth interface pairing in windows
  • YAESU Bluetooth Interface
  • Accesoires
  • Amateur Television
  • Announcements
  • Antennas
  • Contesting
  • Digimodes
  • Events
  • Homebrew
  • Logbooks
  • Measuring
  • MiniBook
  • Packet Radio
  • Portable
  • Projects
  • Propagation
  • Refurbishing
  • Satellite
  • Software
  • Uncategorized
© 2025 PD5DJ | Powered by Superbs Personal Blog theme