📝 Background
This software was written for the club and contest station PI4RCK / PA6Y in the Netherlands. The station runs multiple directional antennas on rotors and sits in a notoriously exposed location. When the wind picks up in this part of the country, it picks up fast — and with several large Yagi antennas mounted on masts, the question is not whether the wind will be a problem, but when.
After a few uncomfortable situations during storm alerts — manually checking and rotating antennas in the middle of the night, or during a contest when nobody has time for it — it became clear that a proper software solution was needed. Something that would watch the wind continuously, and move the antennas to a safe position automatically when conditions got bad, while still allowing full N1MM Logger+ control the rest of the time.
The result is N1MM Rotor Server: a Linux-based rotor controller that is fully compatible with N1MM Logger+, adds a live graphical interface, and includes an integrated wind monitor with automatic storm protection — built around the real-world needs of an active contest station.
N1MM Rotor Server is an antenna rotor controller for Linux, designed to work seamlessly with N1MM Logger+. It runs on virtually any machine with Debian Trixie — from a small Raspberry Pi tucked away in the shack to a regular desktop PC — supports multiple rotors simultaneously, and includes a real-time GTK4 graphical interface, a wind monitor, and automatic storm protection.
🔗 100% compatible with N1MM Logger+
N1MM Rotor Server speaks exactly the same protocol as the rotor server built into N1MM Logger+ — the same UDP port, the same XML command format, the same heading broadcast. From N1MM’s perspective there is no difference: it sends GOTO commands and receives position updates just as it always did.
What is different is everything around it. Where the built-in N1MM rotor server is a basic Windows-only tool with minimal feedback, N1MM Rotor Server adds:
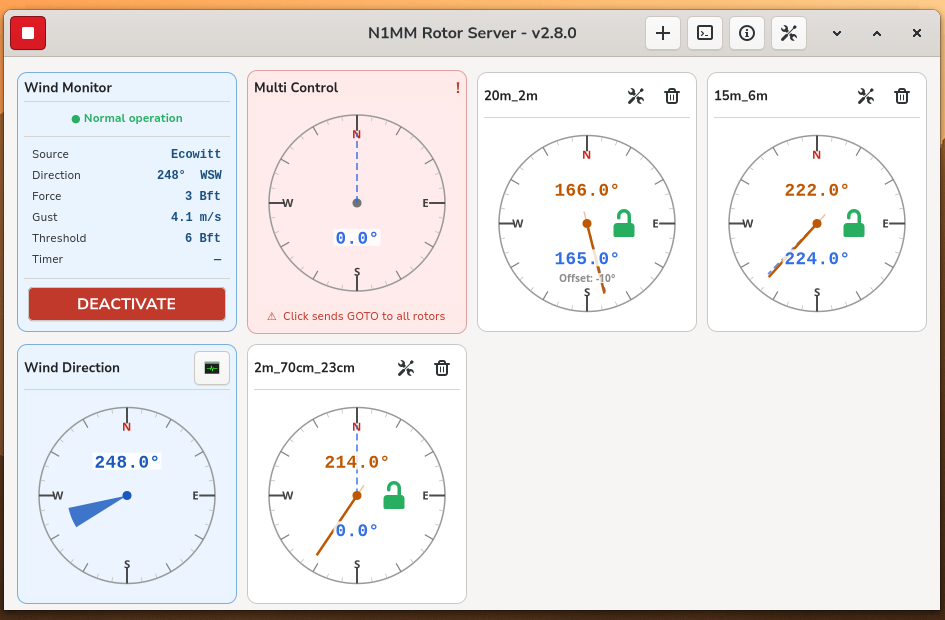
- A live graphical interface with compass roses and real-time position display
- Support for up to 16 rotors running simultaneously
- A wind monitor with multiple data sources
- Automatic storm protection — antennas move to safety when the wind picks up
- A heading offset per rotor to compensate for mechanical misalignment
- Automatic USB reconnect when a cable is unplugged
You simply point N1MM Logger+ at the new server’s IP address — nothing else changes in your contest setup.
🔌 Features at a glance
Control up to 16 rotors simultaneously, each with its own serial port, protocol, baud rate and heading offset.
Yaesu GS-232A/B (auto-detected) and Prosistel CBOX 2003 — selectable per rotor.
GTK4 compass rose per rotor, wind rose, multi-rotor control card and configurable grid layout.
Fetches wind data from online services (Open-Meteo, Yr.no, OpenWeatherMap, WeatherAPI) or receives live pushes from an Ecowitt weather station.
Automatically drives antennas to a safe position when wind force exceeds a configurable Beaufort threshold.
Automatically reconnects rotors when a USB cable is unplugged and re-inserted — no restart needed.
🔧 Supported hardware
| Protocol | Compatible controllers | Notes |
|---|---|---|
| Yaesu GS-232A/B | Yaesu G-800, G-1000, G-2800, G-5500 and compatible | GS-232A and GS-232B auto-detected per session |
| Prosistel | Prosistel CBOX 2003 | CPM mode disabled automatically on connect |
Rotors connect via USB-to-serial adapters and are identified by USB port position (stable by-path symlinks), so the device assignment never changes even when adapters are swapped.
💻 The GUI
The graphical interface (n1mm_rotor_gui) runs as a normal user alongside the server and connects to it automatically via a local Unix socket — no IP address or port configuration needed.
Rotor card
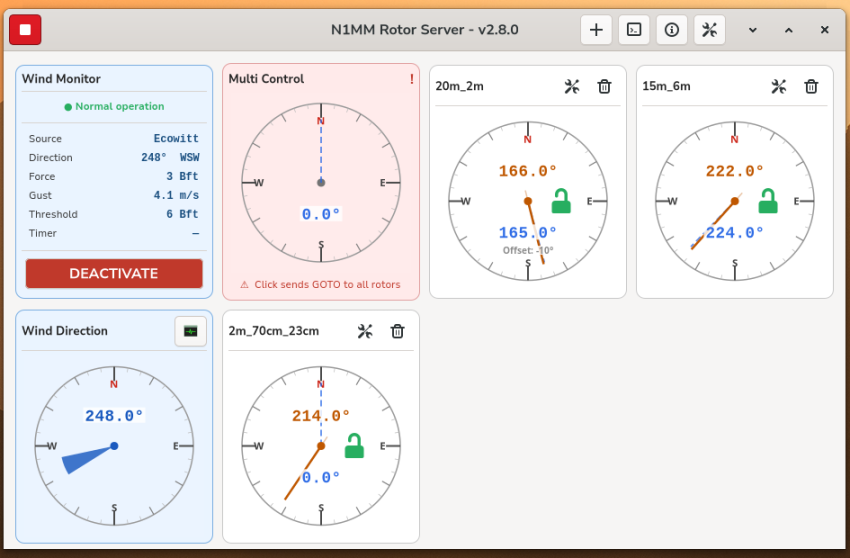
Each rotor gets its own card with a Cairo-drawn compass rose. The orange needle shows the current azimuth, the dashed blue line shows the target. When a heading offset is configured it appears as text inside the compass (e.g. Offset: −10°). During storm mode a colour-coded lock icon appears: green = free, red = GOTO blocked.
Click anywhere on the compass to send a GOTO command directly to that rotor.
/dev/ttyUSBx name for reference.Wind Monitor card
The top-left card always shows live wind data: direction in degrees and compass point, force in Beaufort, gust speed in m/s, the configured storm threshold and a countdown timer. The status indicator at the top switches from green (Normal operation) to orange (Storm correction active) when the sustain timer fires. The large button at the bottom activates or deactivates storm mode with a single click.
Wind Rose card
Directly below the Wind Monitor sits a dedicated compass showing the current wind direction as a solid blue arrow. The tail points to the wind source on the compass perimeter; the tip points toward the centre. When no data is available the rose is greyed out.
Multi Control card
The Multi Control card lets you point all rotors to the same azimuth with a single click — useful at the start of a contest when you want every antenna beaming the same direction, or during a pile-up when you rotate the whole station at once. A red exclamation icon and a warning banner make it impossible to accidentally trigger: you always know exactly what you are about to do.
The Multi Control card respects the same storm blocking rules as individual rotors — if a rotor has GOTO blocked due to active storm correction, the multi-control move will not override it unless that rotor is marked as always controllable.
Configurable layout
The number of grid columns is freely adjustable from 1 to 8 via the settings dialog. The Wind Monitor and Wind Rose always occupy the top-left corner; all other cards fill in from there.
🌡 Wind Monitor
The wind monitor runs as a background thread and broadcasts wind data every second over a local UDP port. The GUI receives it in real time.
Supported wind sources
| Source | How it works | API key |
|---|---|---|
| Open-Meteo | Fetches forecast data via HTTP at a configurable interval | None required |
| Yr.no | Norwegian Meteorological Institute API | None required |
| OpenWeatherMap | Current weather via OWM API | Free tier |
| WeatherAPI | Current weather via weatherapi.com | Free tier |
| Ecowitt (HTTP push) | Ecowitt weather station pushes data directly to the server every 16–60 s | None — uses station PASSKEY |
Internet sources — Open-Meteo, Yr.no and more
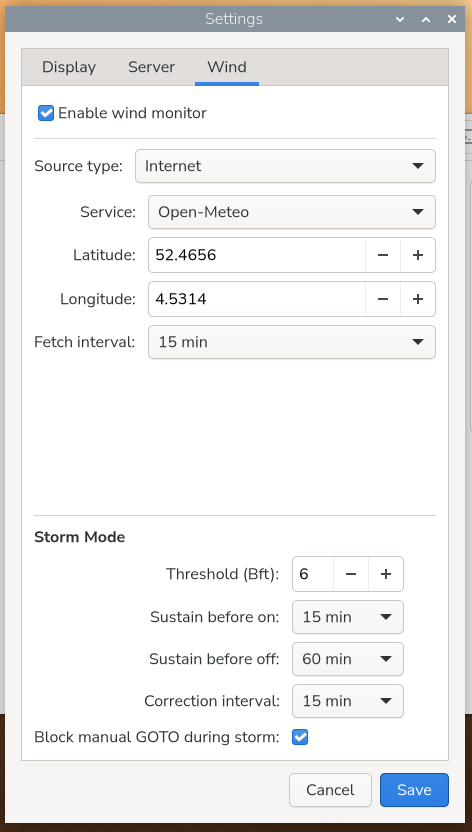
The simplest way to get started: select Internet as the source type, choose Open-Meteo from the service list, enter your latitude and longitude, and set a fetch interval. The server retrieves forecast wind data automatically — no account, no API key, no subscription.
Ecowitt — live data from your own weather station
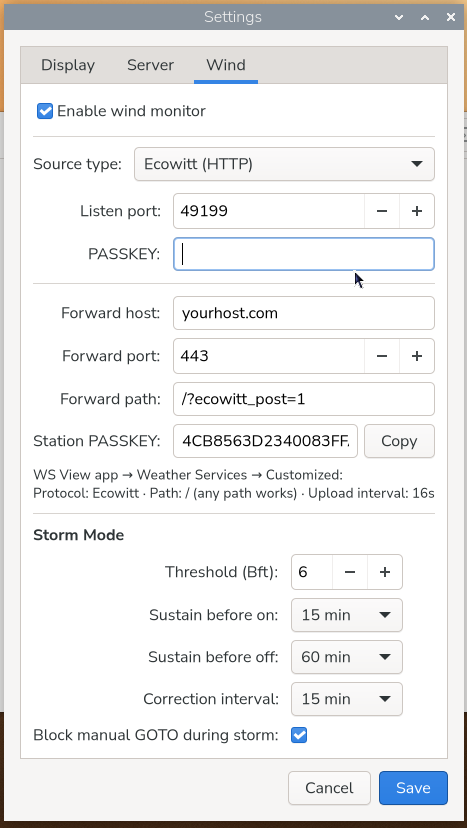
If you have an Ecowitt (or compatible) weather station, select Ecowitt (HTTP) as the source. Configure the station in the WS View app to push data to the server’s IP address and port. Wind data then arrives in real time every 16–60 seconds — far more responsive than polling an internet service.
The server can also forward every received push to a second destination — for example a WordPress weather plugin — over HTTP or HTTPS. The station’s PASSKEY is shown automatically in the Station PASSKEY field as soon as the first push arrives, so you can copy it straight into your plugin’s settings without hunting for it elsewhere.
⛈ Storm Mode
Storm mode is the core reason this software was built. It watches the wind continuously and moves antennas to a safe position automatically — without any human intervention — the moment conditions become dangerous.
How it works
- You activate storm mode once via the ACTIVATE button in the GUI. The server now watches the wind.
- When the wind force exceeds the configured Beaufort threshold and stays above it for the sustain duration, correction begins. The sustain timer prevents a single gust from triggering unnecessary movement.
- Every storm-enabled rotor is driven to its calculated safe azimuth. N1MM Logger GOTO commands are blocked while correction is active (configurable per rotor).
- The server re-sends the GOTO at a configurable interval (e.g. every 15 minutes) so the antenna stays on target even if the wind direction shifts.
- When the wind drops below the threshold for the release duration, correction stops and normal operation resumes. The release timer prevents premature return during a lull.
Storm mode state (on/off) is saved to the config file and survives server restarts — if the server reboots during a storm, it comes back up in exactly the same state.
Per-antenna storm offset
Not every antenna needs to face the same direction in a storm. Each rotor has its own storm offset — a value in degrees relative to the wind direction — so you can position each antenna optimally for its mechanical characteristics:
| Storm offset | Result | Typical use |
|---|---|---|
| 0° | Head directly into the wind | Low wind resistance; good for long boom Yagis |
| 180° | Tail into the wind | Reduces back-pressure on certain antenna types |
| 90° / −90° | Broadside to the wind | Useful when a building or structure provides shelter at that angle |
| Any value −180° to +180° | Custom angle relative to wind | Tailored to site-specific shelter or antenna geometry |
Shortest-path rotation — mechanical stop aware
Rotors have a mechanical stop, typically somewhere around 0°/360°. Driving an antenna the long way around across the stop not only wastes time but can damage the rotor cable. N1MM Rotor Server avoids this automatically.
For every correction move, the server calculates two candidate positions — the primary target and its mirror 180° away (which is always an equally valid safe position, since both put the antenna edge-on or head-on to the wind). It then picks whichever one the rotor can reach via the shortest arc, never crossing the mechanical stop:
- Example: wind is from 10°, storm offset is 0° (head into wind). Target = 10°. If the rotor is currently at 330°, the direct path is only 40° away — but it crosses 0°/360°. The server automatically flips to the mirror position at 190°, which the rotor reaches in 140° without ever crossing the stop. ✓
This logic runs silently every time a correction is applied, so you never have to think about it — the antenna always takes the safe route.
System flow
Storm mode ON
Server watches wind continuously
Wind ≥ threshold
for sustain_min?
NO
● Normal
operation
YES
● Storm correction active
Rotors driven to safe azimuth
(storm offset + shortest path, mechanical stop avoided)
Re-sends GOTO
every interval_min
N1MM GOTO
blocked 🔒
Wind < threshold
for release_min?
NO
YES
Correction stops
Rotors free · N1MM GOTO unblocked
↑ continue monitoring
— can be triggered at any moment —
DEACTIVATE
Storm mode: OFF
All blocking removed · Monitoring stops
State saved to config — survives restart
Legend
User action
Storm correction active
Normal / safe operation
Continue monitoring
Decision point
Re-send loop
Separate path
Storm settings summary
- Threshold (Bft) — wind force that triggers the sustain timer
- Sustain before on — minutes above threshold before correction starts
- Sustain before off — minutes below threshold before correction stops
- Correction interval — how often the GOTO is re-sent during active correction
- Block manual GOTO — globally prevent N1MM from overriding the safe position
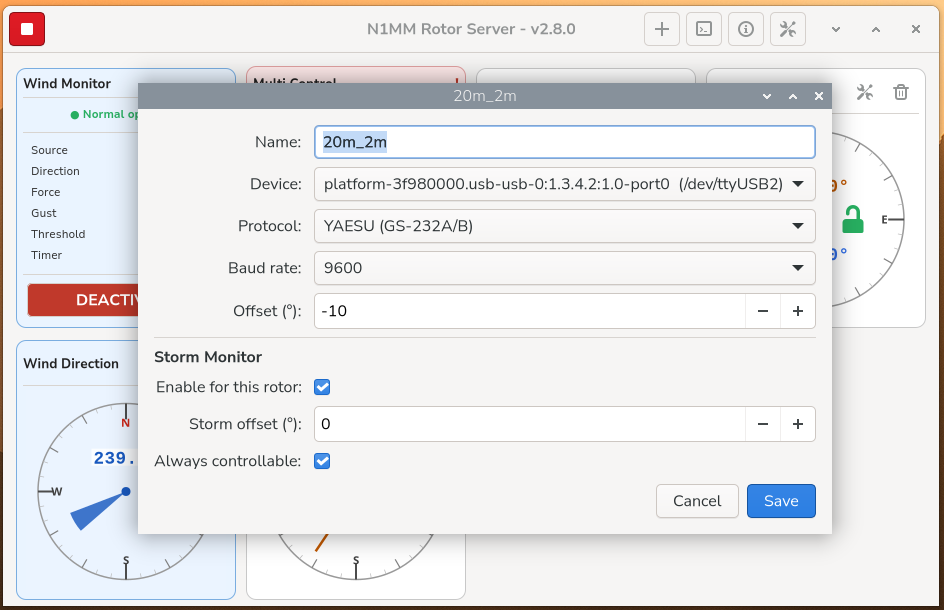
- Always controllable — per-rotor override: this rotor always responds to N1MM, even during storm correction
- Storm offset — per-rotor angle relative to wind direction (−180° to +180°)
💻 Installation
N1MM Rotor Server runs on virtually any machine with Debian Trixie installed — a Raspberry Pi 4 or 5 tucked away in the shack is a popular choice, but a regular PC or mini-PC running Debian works equally well. The only requirement is a desktop environment for the GUI.
Download the source and run the installer:
sudo bash install.shThe installer takes care of everything in one go:
- Installs all build dependencies automatically
- Compiles and installs the server and GUI binaries
- Creates the configuration directory and default config file
- Creates the log file at
/var/log/n1mm_rotor_server.logwith correct permissions - Registers a systemd service so the server starts automatically on boot
- Grants serial port access for rotor communication
After installation, log out and back in once (to activate group changes), then launch the GUI:
n1mm_rotor_guiConfiguration via the GUI
All further configuration is done through the graphical interface — no manual editing of config files is needed. The GUI settings dialog covers everything:
- Rotors — add, edit or remove rotors; select protocol, serial port, baud rate and heading offset
- Server — ports, broadcast addresses and timing intervals
- Wind — wind source, location, Ecowitt settings, forwarding and all storm parameters
The server is started and stopped directly from the GUI. Configuration changes take effect after a server restart, which the GUI prompts you to do automatically.
GOTO blocking — keeping antennas safe during a contest
One of the more subtle challenges with storm protection during a contest is the tension between safety and operability. The storm protection moves an antenna to a safe position — but N1MM Logger+ may immediately send a GOTO command to rotate it back to the working direction. Without any blocking, the protection would be undone within seconds.
N1MM Rotor Server resolves this with a three-level blocking system:
| Setting | Effect |
|---|---|
| Block manual GOTO (global) | When enabled, N1MM Logger+ GOTO commands are silently ignored for any rotor that is actively being corrected. This is the master switch. |
| Enable for this rotor (per rotor) | Only rotors with storm correction enabled participate in automatic positioning. Rotors with it disabled are never moved by the storm system and are never blocked. |
| Always controllable (per rotor) | This rotor is included in storm correction but is never blocked — N1MM Logger+ can still rotate it at any time. Useful for antennas that can handle the wind at any azimuth, or for operators who need full control at all times. |
In practice a typical setup looks like this: all large Yagis have Block manual GOTO enabled and Always controllable off — they are fully protected. A smaller antenna that is mechanically less critical might have Always controllable on, so it still follows N1MM during a contest even when the storm system is active.
Lock icons — status at a glance
While storm mode is active, each rotor card shows a colour-coded lock icon inside the compass rose so the operator can see the situation immediately without opening any dialog:
| Icon | Colour | Meaning |
|---|---|---|
| 🔓 Open lock | Green | Storm mode is active but correction is not yet triggered (wind below threshold or sustain not reached) — rotor is free to respond to N1MM. |
| 🔒 Closed lock | Red | Storm correction is active and GOTO is blocked — N1MM commands for this rotor are being ignored. |
| 🔓 Open lock | Orange | Storm correction is active, but this rotor is marked always controllable — it follows storm positioning AND still responds to N1MM. |
When storm mode is not active, no lock icons are shown — the compass roses remain clean and uncluttered.
⚙ Server settings
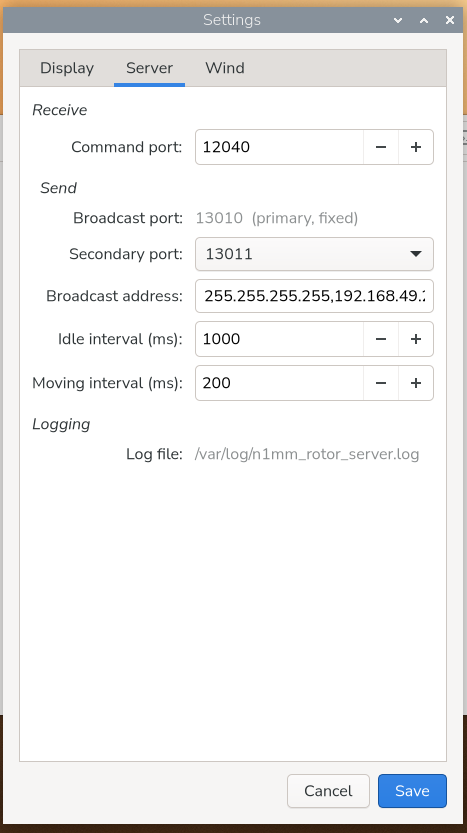
All server parameters are set in the GUI settings dialog. The command port (12040) and primary broadcast port (13010) match the N1MM Logger standard. A secondary broadcast port can be added for a second client — useful if you want both N1MM and a separate display tool receiving position updates simultaneously. Multiple broadcast addresses are supported, comma-separated.
⚙ N1MM Logger+ configuration
In N1MM Logger+, go to Config → Configure Ports, Mode Control, Winkey, etc. and open the Rotor tab:
- Rotor type: N1MM Rotor
- IP address: IP of the machine running the server
- Port:
13010(receive) /12040(send) - Rotor name: must match exactly the name configured in the server
The server reports heading as azimuth × 10 (e.g. 180.0° = 1800), which is the N1MM standard format.
📝 Technical details
Architecture
- Single C source file (
n1mm_rotor_server.c), compiled withgcc -std=c99 - Multithreaded: UDP receiver, poll/broadcast, wind monitor, storm monitor, GUI server
- GUI communicates via Unix domain socket — no network configuration needed
- Broadcast timing adapts per rotor: fast (200 ms) while moving, slow (1 s) when idle
- Stall detection: if azimuth doesn’t change by ≥ 5° within 5 s, the rotor is considered stalled and returns to idle timing
Broadcast protocol
- Receive (N1MM → server): XML on UDP port 12040
- Send (server → N1MM):
NAME @ headingon UDP port 13010 - Secondary broadcast port (13011–13015) supported for additional clients
- Multiple broadcast destination addresses supported
Log file
All server events are logged to /var/log/n1mm_rotor_server.log. The GUI includes a log viewer that follows the file in real time.
📄 License & source
N1MM Rotor Server is developed by Björn Pasteuning — PD5DJ.
© 2024–2026 Björn Pasteuning — PD5DJ